September is getting closer. Also some vegetable pics.
It is very quickly heading for September. The days are getting shorter and the nights are getting longer. The temperatures have dropped and the rain is pooring (Which is a good thing as we need the rain). Autumn is slowly on its way. The housemartins and swifts are thinking about leaving this country on there annual epic migration across sea and land. If you are reading this and are thinking that it sounds very depressing the fact that autumn is only just around the corner then I can say that I find September and October to be very nice. The change in the light levels and the smell of the moist leaves as they change colour and drop to the ground. It is also good to take stock of things that have and are still growing on the allotment. This year so far has been a strange growing year what with the heatwave and the very low rainfall. Some crops did not workout at all yet others thrived. Here are a frew images from my plot of a few of my vegetables I am growing
 My Leeks
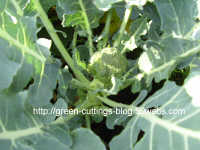 The Broccoli
 My Runner Beans
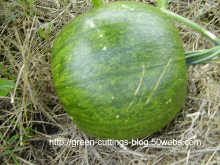 My Little Pumpkin
![]() The_Snail
The_Snail
posted by Froggy @ Tuesday, August 29, 2006
![]()
 A few weeks back we where given some mint stems so we could use the leaves to make some mint source for our Sunday lunch. I decided to make the mint source. When I made the source instead of taking all the leaves of and chopping up the stems also I just took the lower leaves off and left just a few leaves on at the top and all of the small sideshoots on the main stem. I then cut the stem so it was about 3 inches long just below a leaf joint and placed them in a glass of water.
 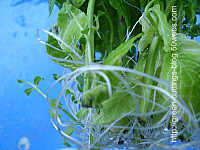 After about 2 weeks or so small fine roots started to form on the stems. These roots I like to call water roots and they are very thin and fragile unlike the roots you find on plants growing in the ground or in compost which are a lot stronger and the density is greater. The roots had formed and it was time to get them potted up. This picture shows the water roots on the mint stems. These took around 2-3 weeks to form after sitting on the kitchen window sill.
 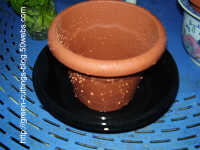 I then gathered together 2 pots and something to stand them on as they are going to grow on for a little bit longer on my bedroom window sill. The pots where dirty so I washed them over in a solution of jeyes fluid (which is an exterior disinfectant). Hence they are wet. I rinsed them over well in fresh water to remove and residue of the disinfectant. I then dried the pots.
 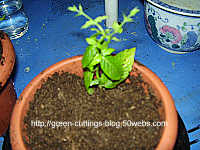 After filling the pots with a good multi purpose compost, being carefull not to over fill them so it is easier to water I carefully so not to damage the fragile roots, placed in the rooted cuttings around the side of the pots. The reason why I placed them around the side of the pots is due to fact that there is more drainage at the side of pots than there is in the center.
 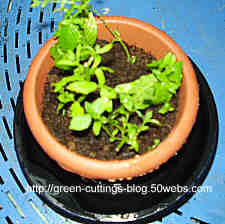 Once the sides of the pots where full I watered them and then placed the plant pots in the stands on my bedroom window sill. That is a very easy way of rooting mint, and also getting some great mint source also.
 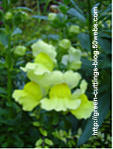 The name snapdragon refers to the formation of the flowers. If the flowers are squeezed together then it looks like the mouth of a dragon opening and closeing. The Snapdragon or (Antirrhinum majus) is closely related to the Toadflax. The Antirrhinum can be seen growing naturaly is the side of building walls and on chalk cliffs in Britain. The Antirrhinum is not a native plant to Britain but it originates from the mediterranean islands. It has escaped from well maintained gardens by seed carried on the wind and by birds to establish itself in our native wildflower collection. There are a few herbal uses for the Antirrhinum, in the older days they used to use the plant as a preservative to ward off the evil withcraft, they also used to use its close relative the toadflax to do the same job.
  The Antirrhinum is now widley grown in cottage style gardens and in many town and city gardens. It is grown as a half hardy annual but by my experience if planted in a sheltered place and the winter is not to severe then the plant may survive and flower again the folowing year.
 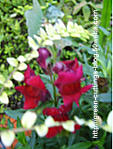 Open the seed packet at the top. Make sure you flick the top of the seed packet so any seeds trapped inside at the top of the packet are allowed to fall to the bottom so you do not waste any and they all have a chance to germanate and grow. Once the packet is open then you will see that the seed is very fine. A good tip for sowing fine seed is to use very fine and very dry horticultural sand. It is like a dry fine salt in consistance. Put a pinch or two of the dry fine horticultural sand into the seed packet and folding over the top of the packet closing it so no seed escapes gently shake the seed packet so the seed is mixed up with the silver sand. Once that has been done sprinkle the seed and sand evenly over the surface of the compost in your pot and then place the pot in a tray of water so that the compost can absorbe the water from the bottom up so not desturbing the seed. The seed does not need covering with compost because it needs light to germanate. I personally do not do that I like to use a very fine rose head on my watering can then gentle pass the water over the pot from side to side so it gently beds the seed into the compost enough so it has a chance to allow the light through and germinate.
 So in my previous post I said I was getting a little tired of eating courgettes. Well I got marrows now for breakfast, dinner and tea.